
1. Introduction to Resistance Bands
Resistance bands have become an essential tool for fitness enthusiasts, offering a versatile and effective means to enhance workouts. They are not only portable and affordable but also provide a range of resistance levels to suit various fitness goals. This guide aims to help you use resistance bands safely and effectively, ensuring you maximize the benefits while minimizing the risk of injury.
Key Takeaways
- Understand the different types of resistance bands and their specific uses to choose the right one for your needs
- Prepare your workout space and handle bands properly to ensure safety and effectiveness during exercises
- Start with basic techniques and gradually increase the complexity of exercises to ensure consistent progress
- Regularly maintain your resistance bands by cleaning and inspecting them for wear and tear to ensure longevity
- Seek advice from fitness professionals and consider combining resistance bands with other equipment for a comprehensive workout regimen
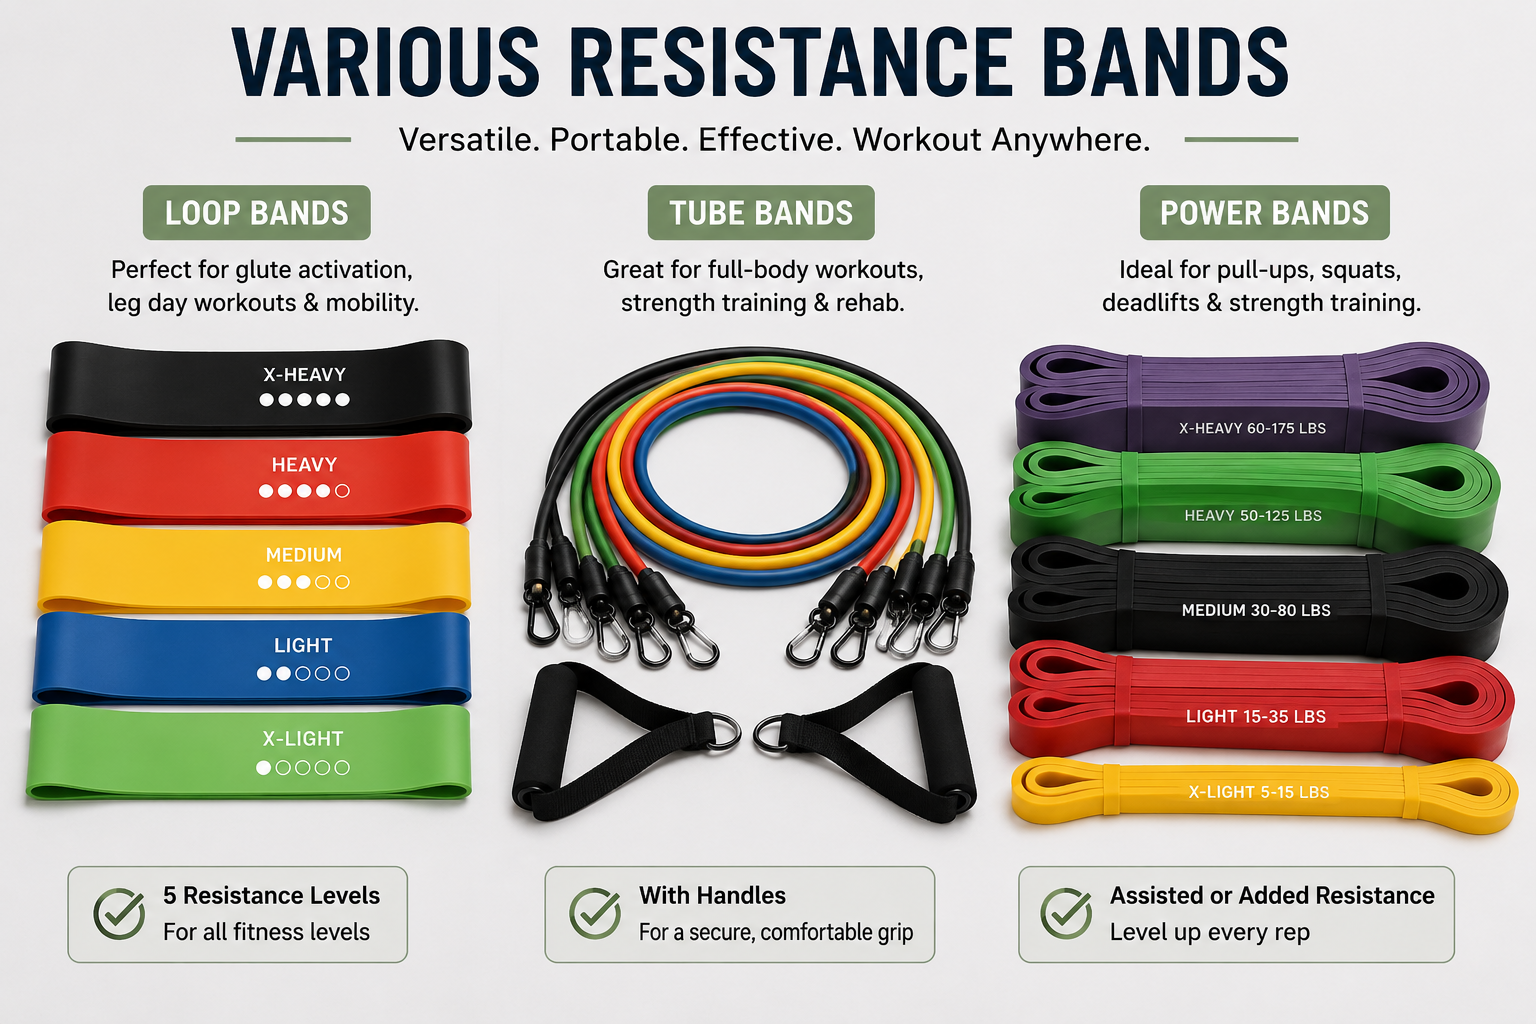
2. Types of Resistance Bands & Their Benefits
Resistance bands come in various forms, each suited for specific types of workouts and fitness levels.
Loop Bands
Perfect for lower body and rehabilitation exercises
Continuous loops of latex or fabric that provide consistent resistance. Ideal for glute activation, leg exercises, and physical therapy.
Key Benefits:
- Excellent for lower body exercises
- Great for rehabilitation and mobility work
- Easy to store and transport
- Available in multiple resistance levels
Best Exercises:
Banded squats, glute bridges, lateral walks, clamshells, and leg extensions.
Tube Bands with Handles
Ideal for upper body and full range movements
Rubber tubes with plastic or foam handles that mimic traditional gym equipment. Perfect for replicating cable machine exercises.
Key Benefits:
- Comfortable handles for secure grip
- Excellent for upper body exercises
- Can be anchored easily
- Interchangeable bands for varied resistance
Best Exercises:
Chest presses, rows, bicep curls, tricep extensions, lat pulldowns, and shoulder presses.
Power Bands
For heavy resistance and assistance training
Extra wide and thick bands designed for heavy resistance training, powerlifting assistance, and adding resistance to bodyweight exercises.
Key Benefits:
- High resistance for strength training
- Great for powerlifting assistance
- Can be combined for progressive overload
- Durable construction for heavy use
Best Exercises:
Band-assisted pull-ups, heavy squats, deadlifts, bench presses, and explosive movements.
Benefits of Resistance Bands Training
Portability
Lightweight and compact, resistance bands can be used anywhere - at home, in hotel rooms, or outdoors - making them perfect for travel.
Joint-Friendly
Provides constant tension without heavy impact, reducing stress on joints while still building strength effectively.
Variable Resistance
Creates increasing resistance through the full range of motion, engaging muscles more effectively than free weights alone.
Affordability
A complete set of resistance bands costs less than a single pair of adjustable dumbbells, offering incredible value.
Accessibility
Suitable for all fitness levels, from rehabilitation patients to elite athletes, with adjustable resistance levels.
Versatility
Can be used for strength training, mobility work, stretching, physical therapy, and even yoga.
Choosing the Right Resistance Level
Color Coding System: Most bands use a standard color system to indicate resistance levels:
Beginners: Start with light to medium bands. You should be able to complete 12-15 reps with good form and moderate challenge.
Intermediate: Use medium to heavy bands. Aim for 8-12 reps with the last 2-3 reps being challenging but maintainable.
Advanced: Use heavy to extra-heavy bands or combine multiple bands. Target 4-8 reps with maximum effort on the last rep.
Tip: For most exercises, the band should provide enough resistance that the last few reps are challenging but you can still maintain perfect form.
3. Building a Solid Foundation: Proper Technique
Proper form is crucial for preventing injuries and maximizing the effectiveness of your resistance band workouts. Learning correct technique early sets a solid foundation for all types of exercises.

Proper form demonstration for various resistance band exercises
Secure Anchoring
Ensure bands are securely anchored before use. Use door anchors properly and check stability for safety.
Controlled Movement
Move through the full range of motion with controlled speed. Avoid snapping the band back quickly.
Proper Band Positioning
Position bands correctly on your body or anchor points to ensure optimal resistance and prevent slippage.
Breathing Technique
Exhale during the exertion phase (stretching the band), inhale during the return phase. Never hold your breath.
Stable Base
Maintain a stable stance with feet shoulder-width apart. Keep core engaged for balance and power transfer.
Mind-Muscle Connection
Focus on the target muscle group. Visualize it working throughout the entire movement for better activation.
Common Mistakes to Avoid
- Overstretching: Stretching bands beyond 2.5-3 times their resting length
- Poor Anchoring: Not securing bands properly, leading to slippage or snapping
- Using Momentum: Jerking or swinging to complete movements
- Incorrect Resistance: Using bands that are too light or too heavy for the exercise
- Neglecting Form: Sacrificing technique for more reps or harder resistance
- Skipping Warm-up: Not preparing muscles and joints for elastic resistance
Professional Guidance: Consider working with a certified trainer for 1-2 sessions to learn proper band techniques, especially if you're new to resistance training.
Starting Exercises for Beginners
Band Rows
Upper back and posture
Bicep Curls
Arm strength
Squats
Legs and glutes
Lateral Walks
Hips and glutes
Chest Press
Chest and shoulders
Shoulder Press
Shoulder development
4. Creating an Effective Workout Plan
A well-structured workout plan with realistic goals, balanced routines, and progressive overload is essential for continuous improvement with resistance bands.
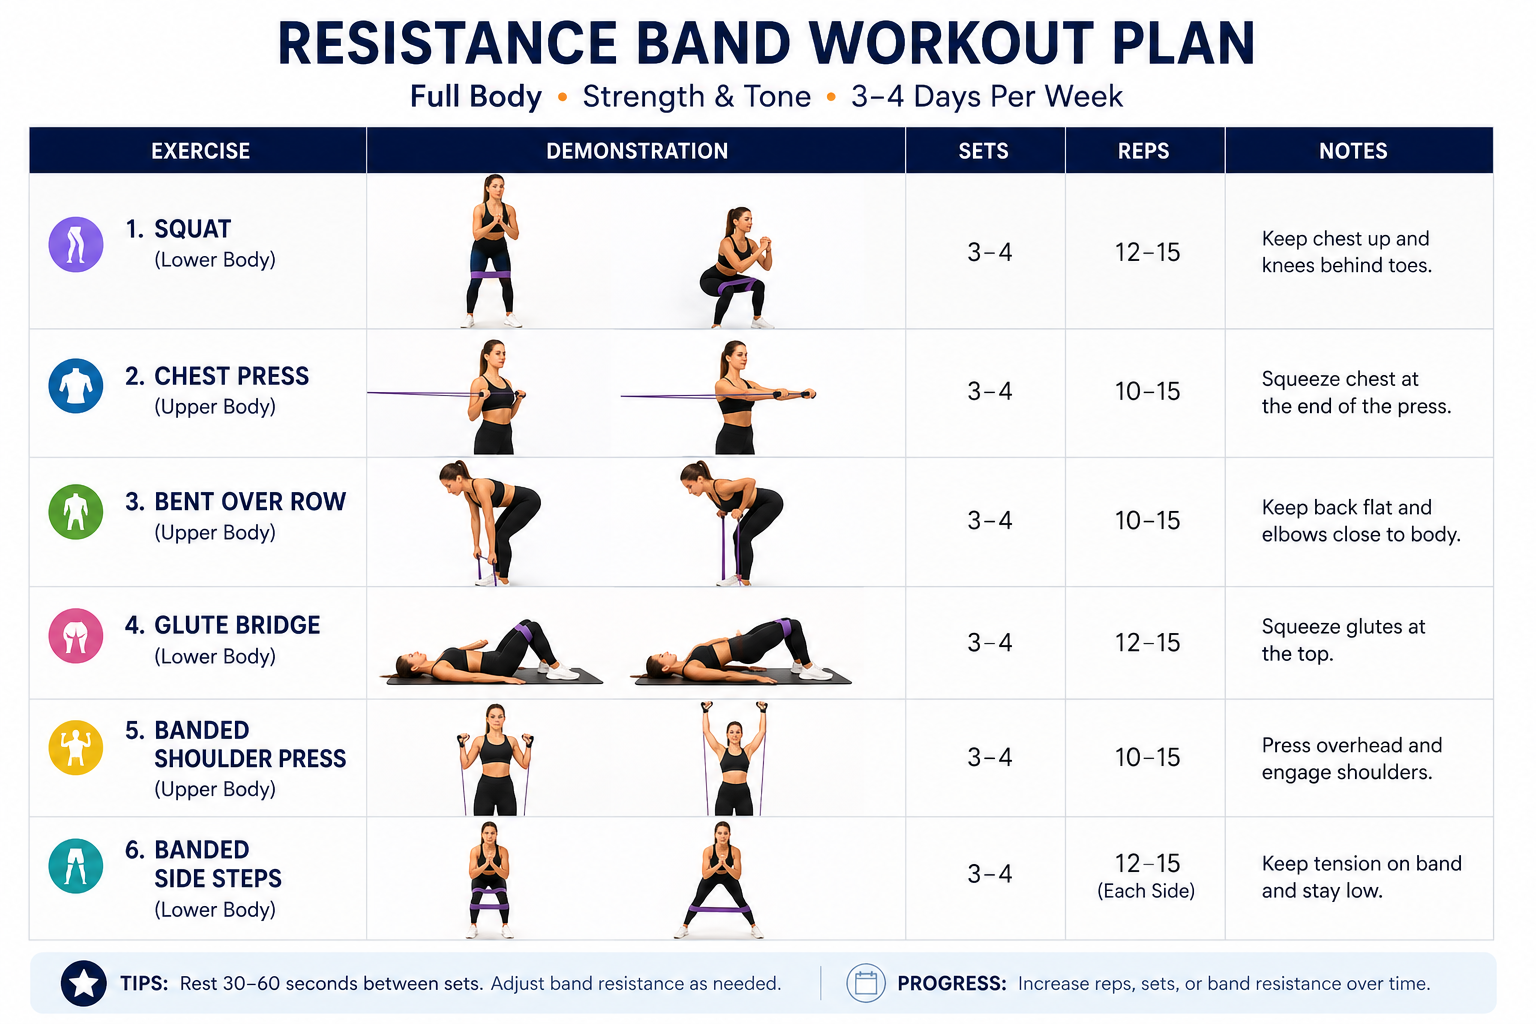
Sample resistance band workout plan showing exercise selection, sets, and reps
Setting Realistic Goals
SMART Goal Setting
Goals should be Specific, Measurable, Achievable, Relevant, and Time-bound. Example: "Increase band resistance by one level in 8 weeks."
Progress Tracking
Track resistance levels, reps, sets, and how you felt. Note when you progress to harder bands or more challenging variations.
Consistency Over Intensity
3 consistent moderate workouts per week yield better results than 1-2 extreme sessions followed by burnout.
Balanced Routine Structure
Upper Body Push
Chest press, shoulder press, tricep extensions
Upper Body Pull
Rows, lat pulldowns, face pulls
Lower Body Push
Squats, lunges, leg presses
Lower Body Pull
Deadlifts, hip thrusts, glute bridges
Core Work
Pallof presses, wood chops, standing crunches
Cardio Integration
Band-resisted cardio, 20-30 minutes, 2-3x weekly
Progressive Overload Principles for Bands
Increase Resistance: Move to a thicker band or add a second band
Increase Reps: Add 1-2 reps before increasing resistance
Increase Sets: Add an extra set to your exercises
Decrease Rest: Reduce rest periods between sets
Increase Time Under Tension: Slow down the movement (3-4 seconds each way)
Advanced Variations: Try more challenging exercise variations
Sample Full Body Workout Plan
| Exercise | Muscle Group | Sets x Reps | Rest | Band Type |
|---|---|---|---|---|
| Band Squats | Legs & Glutes | 3x12-15 | 60s | Loop Band |
| Chest Press | Chest & Shoulders | 3x10-12 | 60s | Tube with Handles |
| Seated Row | Back & Biceps | 3x10-12 | 60s | Tube with Handles |
| Glute Bridges | Glutes & Hamstrings | 3x12-15 | 45s | Loop Band |
| Shoulder Press | Shoulders | 3x10-12 | 60s | Tube with Handles |
| Bicep Curls | Biceps | 3x12-15 | 45s | Tube with Handles |
| Tricep Extensions | Triceps | 3x12-15 | 45s | Tube with Handles |
| Plank with Band Pull | Core | 3x30s | 30s | Loop Band |
Advanced Resistance Band Workouts
Building Strength and Endurance
Focus on increasing time under tension and progressively adding more challenging band resistances. Incorporate band-assisted pull-ups or heavy band squats.
Targeting Specific Muscle Groups
For targeted muscle growth, use bands to isolate specific areas. Exercises like banded leg curls for hamstrings or banded tricep extensions can be highly effective.
Incorporating Bands into Daily Routines
Add resistance bands to your daily routine without needing extensive equipment. Simple activities like using a band during morning stretches can significantly improve flexibility.
5. Safety Measures & Band Maintenance
Safety should always be your top priority when using resistance bands. Follow these guidelines to prevent injuries and ensure your bands last longer.
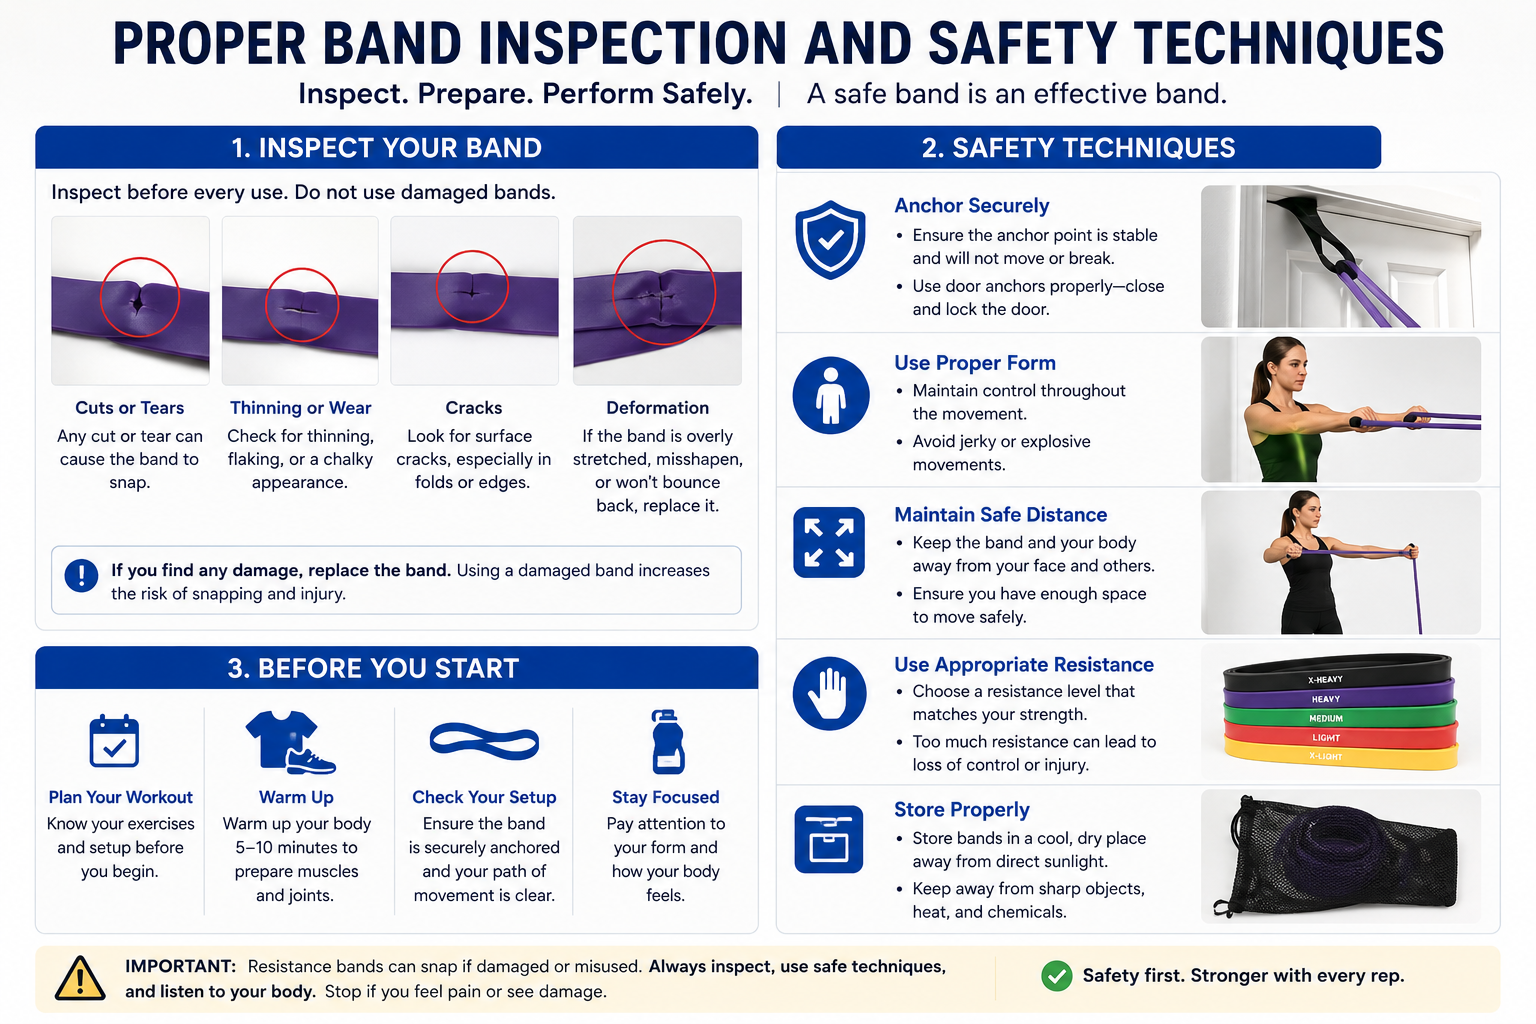
Proper band inspection and safety techniques
Safety Precautions Before Starting
Always warm up with light stretching or a quick walk to prepare your muscles and joints. Make sure you understand how to perform each exercise correctly to avoid injury. Always listen to your body and stop if you feel any pain or discomfort.
Proper Band Handling: Always check your bands for any signs of wear or damage before use. Stretch the bands slowly to avoid sudden snaps, and never pull them beyond their recommended length (typically 2.5-3 times resting length).
Proper Band Handling
Stretch bands gradually, not abruptly. Maintain control throughout the entire range of motion. Release tension slowly.
Warm-up Essentials
5-10 minutes light cardio, then dynamic stretches. Perform 1-2 light warm-up sets with bands before working sets.
Cool-down Protocol
5-10 minutes light stretching with bands, focusing on muscles worked. Hold each stretch 30 seconds.
Workout Space Preparation
Clear area of obstacles. Ensure floor is stable and non-slip. Check anchor points are secure before starting.
Equipment Inspection
Regularly check bands for tears, cracks, or fraying. Inspect handles and anchors for damage before each use.
Injury Prevention
Listen to your body. Distinguish between muscle fatigue and joint pain. Rest when needed. Don't overtrain.
Maintaining Your Resistance Bands
Cleaning and Storage
To ensure the longevity of your resistance bands, regular cleaning is essential. Handwash your bands with warm water and a mild soap, gently rubbing to remove dirt and sweat. After washing, allow them to air dry completely before storing. Store your bands in a cool, dry place away from direct sunlight and extreme temperatures to prevent degradation.
Regular Inspection for Wear and Tear
It is crucial to regularly inspect your bands for any signs of wear and tear. Look for small tears, cracks, or fraying. If any damage is observed, it's best to replace the band to avoid the risk of injury. Regular checks can significantly extend the life of your bands and ensure safety during workouts.
When to Replace Your Bands
Resistance bands do not last forever; they wear out and need replacement over time. Replace your bands if you notice persistent signs of wear or if they lose their elasticity. This will help maintain the effectiveness of your workouts and ensure your safety. Most bands last 6-12 months with regular use.
6. Overcoming Common Challenges
Even with proper technique, you may encounter some challenges when using resistance bands. Here's how to overcome them.
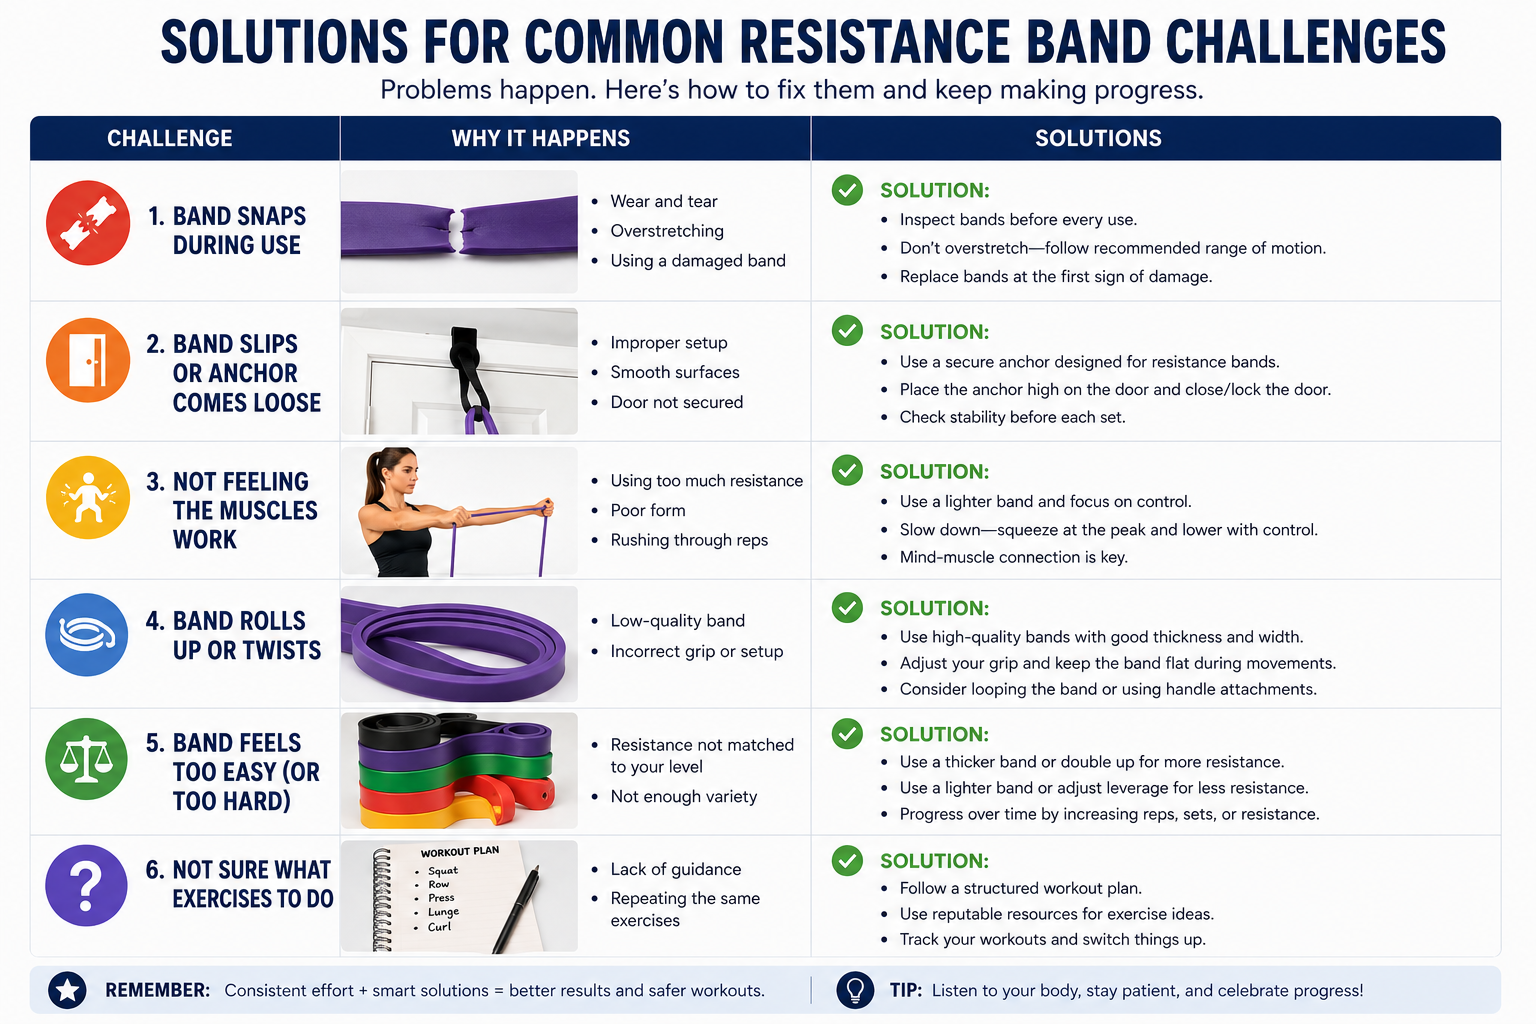
Image: Solutions for common resistance band challenges
Dealing with Band Slippage
Maintain secure positioning during exercises
Prevention Strategies:
- Ensure bands are dry and clean before use
- Place on surfaces with good friction (yoga mat)
- Use proper anchoring techniques
- Wear clothing that provides grip
Solutions:
- Adjust band position frequently during workouts
- Use door anchors for secure attachment
- Try different band placements for same exercise
- Consider non-slip band varieties
Tip: For loop bands on legs, position them higher on thighs for certain exercises to prevent rolling.
Adjusting Resistance Levels
Customize challenge for optimal training
Methods to Adjust Resistance:
- Use thicker or thinner bands
- Combine multiple bands together
- Change your grip position on the band
- Alter the band's starting length
Progressive Overload Techniques:
- Start with lighter bands, progress to heavier
- Use combination of bands for intermediate levels
- Increase reps before increasing band resistance
- Slow down movements for more time under tension
Tip: Keep a set of bands with different resistance levels to easily progress as you get stronger.
Avoiding Overextension
To avoid overextending the bands, which can lead to injury or band damage, be mindful of the band's elasticity limits. Do not stretch the band more than twice its resting length. Regularly inspect your bands for any signs of wear or damage that could affect their integrity.
Signs of Overextension: Band becomes visibly thin when stretched, loss of elasticity over time, visible stress marks or white lines on the band surface.
Safety Rule: If you need to stretch a band more than 2.5 times its length to get sufficient resistance, you need a lighter band for that exercise.
Expert Tips and Advice
Always consult with a fitness professional before starting any new workout regimen, especially when incorporating resistance bands. They can provide personalized guidance based on your fitness level and goals.
Combining Bands with Other Equipment
Resistance bands can be effectively combined with other workout equipment to enhance your exercise routine. For example, using bands with dumbbells or kettlebells can increase the intensity and variety of your workouts.
Personalizing Your Workout Regimen
To maximize the benefits of resistance bands, tailor your workouts to your specific needs. Consider factors like your fitness level, goals, and any physical limitations. Regularly update your workout plan to keep it challenging and effective.
Gradual Progression
Start with lighter bands and gradually progress to higher resistance levels to avoid injury and ensure steady progress. Don't rush to the heaviest bands - proper form with lighter resistance yields better results than poor form with heavy resistance.
7. Frequently Asked Questions
Common questions and answers about resistance bands training:
What are the different types of resistance bands?
Resistance bands come in various types such as loop bands, tube bands with handles, therapy bands, and figure-eight bands, each serving different purposes and levels of resistance. Loop bands are ideal for lower body exercises, tube bands are often used for upper body workouts due to their handles, and power bands are best for adding assistance or resistance to weightlifting exercises.
How often should I replace my resistance bands?
You should inspect your bands regularly for signs of wear and tear and consider replacing them at least once a year or sooner if they show any signs of damage or overstretching. With regular use (3-5 times per week), most bands last 6-12 months. Replace immediately if you see cracks, tears, or significant loss of elasticity.
What are the key benefits of using resistance bands?
Resistance bands provide adjustable resistance, enhance muscle strength, improve flexibility, and can be used for a comprehensive full-body workout. They are also portable and cost-effective. Additional benefits include joint-friendly exercise, variable resistance throughout the range of motion, and the ability to target stabilizer muscles.
How can I prevent resistance bands from slipping during exercise?
Ensure a secure grip or attachment point, use proper form, and possibly invest in non-slip bands or accessories designed to prevent slippage. Keep bands clean and dry, use on non-slip surfaces, and adjust positioning frequently. For loop bands on legs, wearing longer shorts or pants can help prevent rolling.
Can resistance bands be combined with other exercise equipment?
Yes, resistance bands can be effectively combined with other equipment like free weights, exercise balls, or machines to enhance workout intensity and variability. For example, adding bands to barbell exercises increases resistance at the top of the movement, or using bands with dumbbells creates variable resistance throughout the range of motion.
What is the best way to store resistance bands?
Store resistance bands in a cool, dry place away from direct sunlight. Hang them or lay them flat, avoiding kinks and twists to maintain their elasticity and lifespan. Do not store bands stretched or under tension. Keep them away from sharp objects and extreme temperatures.
How do I choose the right resistance level for my fitness level?
Beginners should start with light resistance bands that allow 12-15 reps with good form. Intermediate users should choose medium resistance for 8-12 reps. Advanced users can use heavy bands for 4-8 reps. The band should provide enough resistance that the last few reps are challenging but you can still maintain perfect form throughout.
Are resistance bands effective for building muscle?
Yes, resistance bands can be very effective for building muscle when used properly. They provide constant tension throughout the entire range of motion, which can lead to significant muscle growth. For best results, use progressive overload (increasing resistance over time), train to muscle fatigue, and ensure proper nutrition and recovery.
8. Getting Started & Next Steps
You now have comprehensive knowledge about resistance bands training. Here's your action plan for success:
Your Resistance Bands Success Plan
- Step 1: Assess your current fitness level and goals
- Step 2: Choose appropriate bands for your level (start with a set)
- Step 3: Master basic form with lighter resistance
- Step 4: Create a balanced weekly workout schedule
- Step 5: Implement progressive overload gradually
- Step 6: Prioritize recovery, nutrition, and band maintenance
- Step 7: Track your progress consistently
- Step 8: Adjust your program every 4-6 weeks
Post-Workout Recovery
Allow 48 hours rest between training same muscle groups. Include active recovery days. Use bands for gentle stretching and mobility work on off days.
Nutrition for Elastic Resistance Training
Consume adequate protein for muscle repair (0.7-1g per lb of bodyweight). Stay hydrated. Time carbohydrates around workouts for energy.
Listening to Your Body
Distinguish between muscle soreness and injury pain. Take deload weeks every 6-8 weeks. Adjust intensity based on energy levels and recovery.
Conclusion
In conclusion, resistance bands are an invaluable tool for enhancing your fitness routine, offering versatility, affordability, and portability. Whether you're a beginner or an experienced athlete, understanding how to use these bands safely and effectively can significantly boost your workout efficiency and help you achieve your fitness goals.
Remember to start with the appropriate resistance level, focus on proper form, and progressively increase the intensity to avoid injury and maximize benefits. With consistent practice and adherence to safety guidelines, resistance bands can be a game-changer in your fitness journey.
Ready to Start Your Resistance Band Journey?
Incorporating resistance bands into your fitness routine can significantly enhance strength, flexibility, and overall health when done correctly. Start with proper form, progress gradually, and prioritize safety above all else.
Review the Guide Again